3 Installation and Adjustment Guidelines for the Guideway
3.1 Preparing for Installation
3.1.1 Required Tools and Equipment
- Fastening screws
- Torque wrench
- ESD protection kit
- Oil stone
- Cleaning materials
3.1.2 Preparing the Locating Surfaces
- Check locating surfaces of the machine bed and mounting plate for shape and position accuracy
- Clean all locating surfaces thoroughly. Remove ridges and surface irregularities with an oil stone
- Clean the locating and supporting surfaces of the guideways and carriage with a clean cloth
- Lightly oil the locating and supporting surfaces
Attention
Use white spirit or alcohol for cleaning. Do not use nitro thinner or acetone, since they can damage the measuring system.
Never use compressed air!
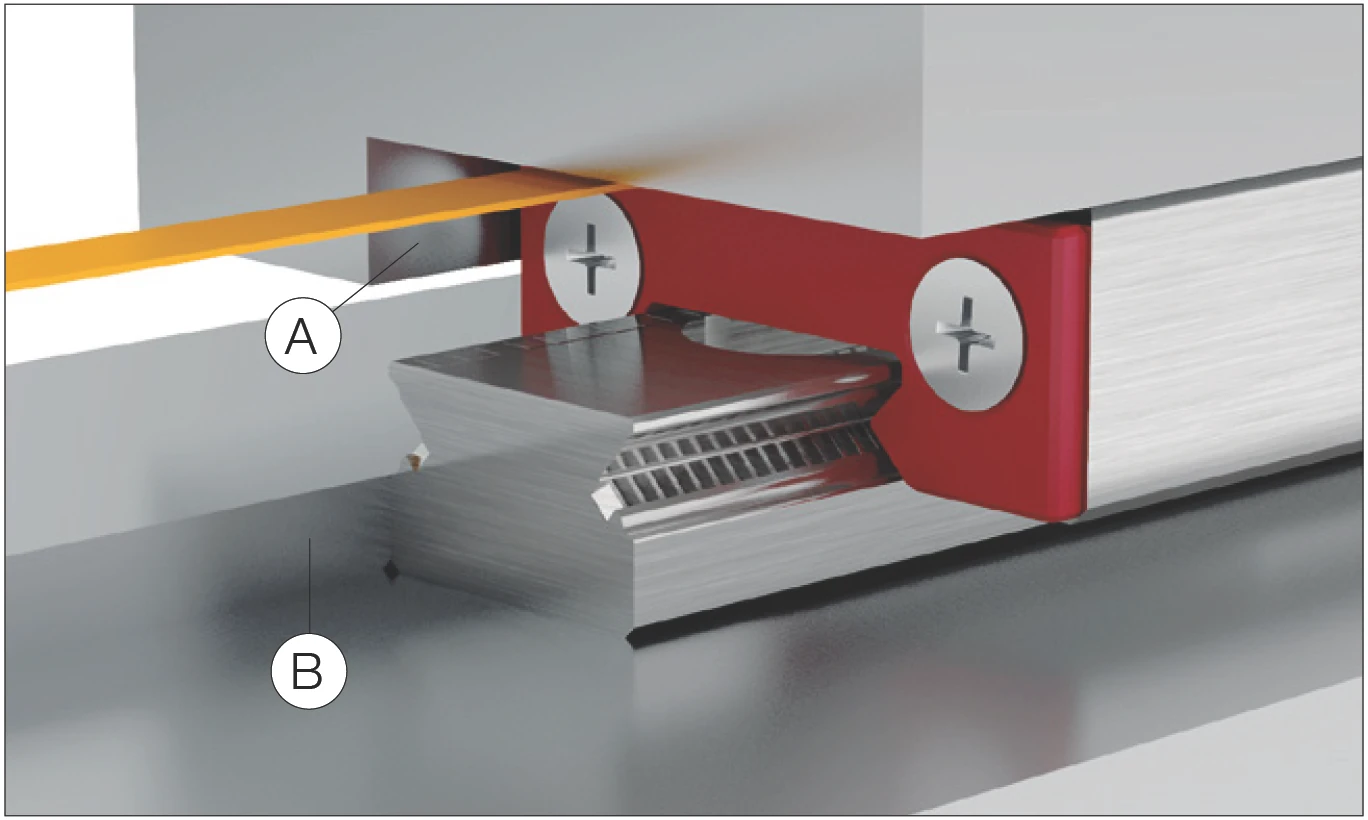
Locating surfaces
A Reference on the mounting plate for the carriage
B Reference on the machine bed for the guideway (both sides of the guideway can be used as locating surfaces)
3.2 Installing the Guideway

- Before installation, the guideway, machine bed, mounting plate and fastening screws must all be at room temperature.
- The MINISLIDE MSQscale sensor is an electrostatically vulnerable component and is delivered in ESD-protective packaging. To ensure the sensor remains protected, the ESD-protective packaging should not be removed during installation of the MINISLIDE MSQscale guideway.
- Always tighten the fastening screws with a torque wrench. See section 3.2.1 for tightening torques.
- With relatively long guideways, tighten the fastening screws alternately starting at the middle of the guideway.
- Always brace the locating surface of the guideway against the locating surface of the machine bed. The guideway can be located on both sides, the locating side of the carriage is opposite the carriage side with the company logo/type designation.
- The screws can be inserted and tightened through the opening in the carriage.
3.2.1 Tightening Torques for the Fastening Screws
The recommended torque values can be found in the table below. These values apply to oiled screws.
The friction coefficient can be reduced by up to half when using greases containing MoS2. The corresponding torque values should be reduced by half.
The following table shows the torque values for the fastening screws of strength class 12.9 (friction coefficient 0.125) and of the strength class A2-70 (friction coefficient 0.2) in accordance with DIN 912:
| Thread size | Tightening torque (Ncm) | |
|---|---|---|
| Strength class 12.9 | Strength class A2-70 | |
| M1.6 | 28 | 20 |
| M2 | 60 | 30 |
| M3 | 210 | 110 |
| M4 | 500 | 260 |
3.3 Cleaning the Dimensional Scale
The MINISLIDE MSQscale is a closed system. Neither the sensor head in the carriage nor the dimensional scale on the guideway can be cleaned completely, and usually this is not necessary.
If the dimensional scale is very dirty at the ends of the guideway, it can be wiped with a clean, lint-free cloth. Never use liquid cleaning products. (The dimensional scale is protected by a thin grease layer acting as a protective film. If the surface is degreased, this protective film will be removed.)
3.4 Lubrication
The MINISLIDE MSQscale is lubricated in the factory and supplied ready for installation. No additional lubrication or cleaning is necessary. Do not degrease the tracks during installation.
3.4.1 MINISLIDE Subsequent Lubrication Intervals
The relubrication intervals depend on many factors, including the load, operating environment, speed, etc., and therefore cannot be calculated. It is therefore necessary to monitor the lubrication point over a relatively long time.
The initial factory lubrication may be sufficient for several years, depending on the load.
Always use the original type of grease for relubrication. Apply the lubricant to the tracks. Use only small amounts of lubricant, since overlubrication can cause failure of the optical sensors.
For more information on lubrication, see the MINISLIDE MSQscale product catalog, Section 3.3 "Lubrication".